Logic Pro : Create a Custom 808 Trap Bass with ES2
Introduction
Welcome to this new tutorial on hip-hop production tricks! In this guide, I’ll show you how to create a powerful, professional-sounding 808 trap bass using Logic Pro’s built-in ES2 synthesizer. This technique is used by countless producers to achieve the deep, punchy low-end that defines modern trap and hip-hop music.
ES2 is one of Logic’s most versatile synths, and with the right settings you can design custom 808s that rival any commercial sample pack. Let’s dive in.
What You’ll Need
- Logic Pro X (any version that includes ES2)
- Basic knowledge of Logic’s interface
- Studio monitors or headphones with solid low-frequency response
Step-by-Step Guide
Step 1: Create an Instrument Track with ES2

- In Logic Pro, create a new Software Instrument Track
- Load the ES2 synthesizer
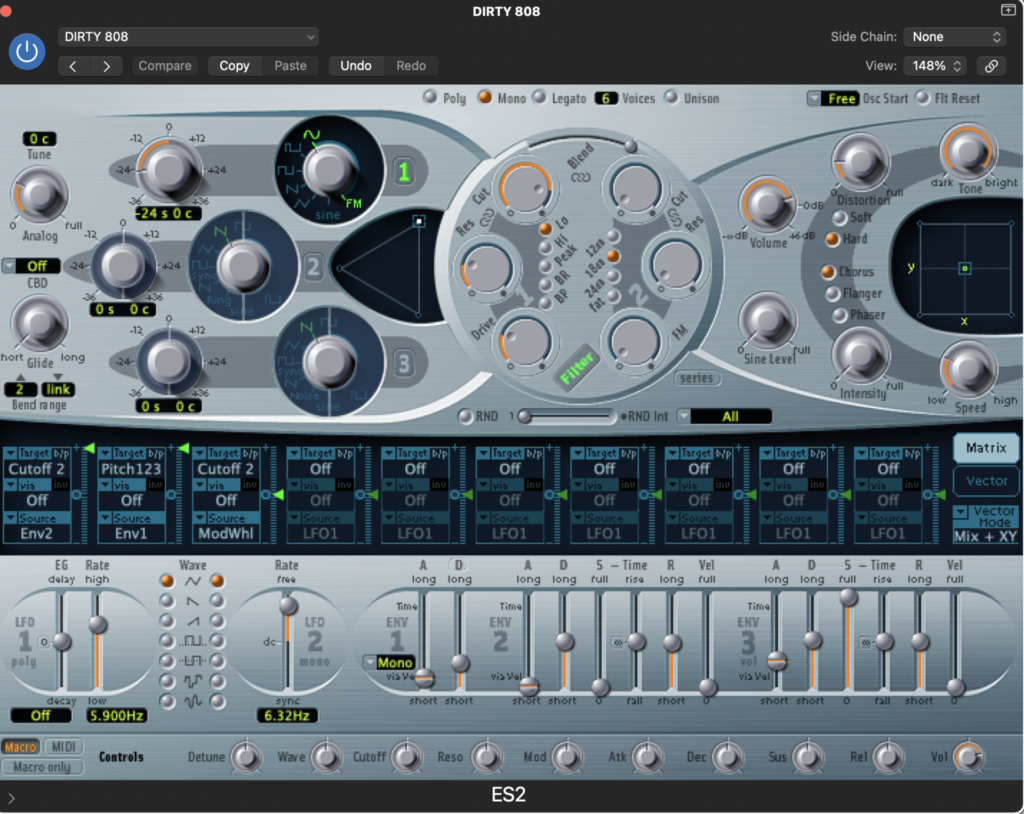
- From the preset menu, select “Analog Saw Inits” inside the Tutorial Settings folder
This preset gives us a clean, neutral starting point with minimal processing.
Step 2: Enable Mono Mode

This step is crucial for any proper 808 bass.
- In the lower section of ES2, locate the Mono button
- Click it to activate Mono mode
Mono mode ensures that only one note plays at a time, preventing overlapping bass notes that can cause phase issues and muddy low-end. Tight and controlled bass always starts here.

Step 3: Select the Sine Wave
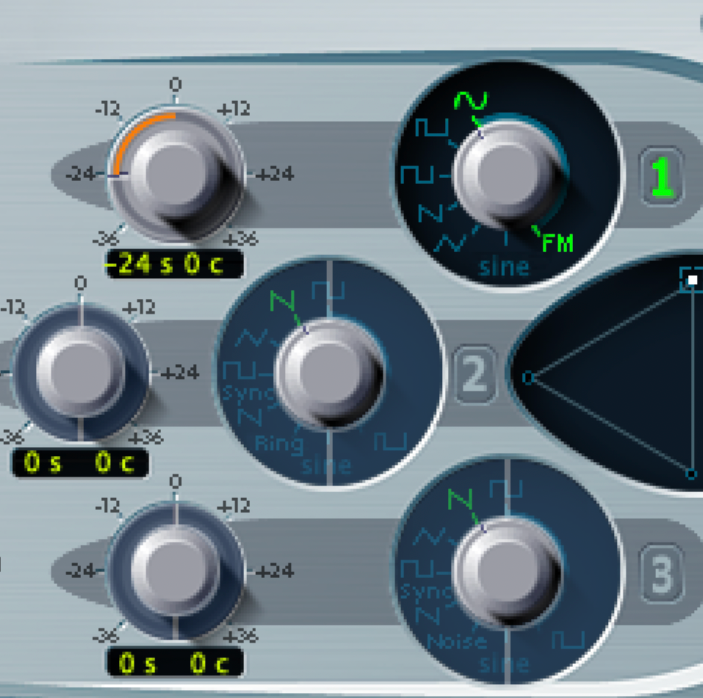
- On Oscillator 1 (the left oscillator), choose the Sine wave
The sine wave contains only the fundamental frequency, making it perfect for clean, deep sub-bass. This is the core of any classic 808.
Step 4: Transpose Down 24 Semitones
- Set Oscillator 1 to -24 semitones (two octaves down)
- Use the orange pitch knob until you see -24 displayed
This ensures that when you play middle C, the sound sits in the correct low-frequency range used by 808 basslines.

Step 5: Matrix Routing – Pitch Control
This step creates the iconic 808 pitch-drop attack.
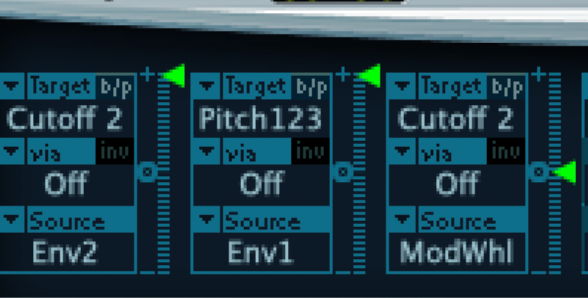
- Open the Router / Matrix section at the bottom of ES2
- Find the row where the Target is set to Pitch123
- Set the Source to Env 1
- Turn the modulation amount all the way up

Envelope 1 now controls the pitch of all oscillators. Its fast attack creates the classic “click” or pitch snap at the beginning of each note.
Step 6: Filter Cutoff Configuration
- In the Matrix section, locate Target: Cutoff 2
- Set the Source to Env 2
- Set the modulation amount to Off (or zero)
This prevents filter movement from interfering with the clean, solid low-end of the 808.

Step 7: Envelope Settings
Envelope 2 & 3 – Release Time
- Locate ENV 2 and ENV 3
- Increase the Release time on both envelopes
A longer release allows the 808 to sustain naturally. Typical values range from 500 ms to 1000 ms, depending on your tempo and groove.
Envelope 1 – Pitch Attack
- On ENV 1, set a very fast Attack (almost instant)
- Make sure Mono mode is active
The attack time controls how fast the pitch drops from high to low, defining the character of your 808 hit.
Step 8: Reduce Rumble with the High-Pass Filter
- At the top of ES2, locate the High-Pass Filter
- Bring the Cutoff down to zero (or very close)
This helps remove unnecessary sub-rumble while keeping the bass focused and controlled.
Step 9: Add Character with Drive and Distortion
- On the right side of ES2, locate the Drive section
- Add a moderate amount of drive (around 30–50%)
- Set the distortion type to Hard
Drive adds harmonic content that helps the 808 translate on smaller speakers while still preserving sub-bass power.
Final Settings Summary
| Parameter | Setting |
|---|---|
| Preset | Analog Saw Inits |
| Mode | Mono |
| Oscillator 1 Wave | Sine |
| Oscillator 1 Pitch | -24 semitones |
| Matrix Pitch123 | Env 1 – Max |
| Matrix Cutoff 2 | Env 2 – Off |
| ENV 1 Attack | Fast |
| ENV 2 & 3 Release | 500–1000 ms |
| High-Pass Filter | Cutoff near zero |
| Drive | 30–50% |
| Distortion | Hard |
Tips for Using Your 808 Bass
Playing Technique
- Keep patterns simple and rhythmic
- Alternate short hits and long sustains
- Stick to root notes, fifths, and octaves to stay solid in key
Mixing Tips
- Sidechain the 808 to the kick for clarity
- High-pass other instruments around 100–150 Hz
- Add subtle saturation if the bass feels weak on small speakers
- Use gentle compression (around 4:1) to control dynamics
Common Mistakes to Avoid
- Overlapping notes in bass patterns
- Notes that sustain too long and clash with the kick
- Ignoring sidechain compression
- Using excessive distortion and losing sub-bass energy
Customization Ideas
Longer Decay
Increase ENV 2 and ENV 3 release times for smoother, rolling 808s.
More Aggressive Attack
Increase pitch modulation or fine-tune ENV 1 attack for a sharper snap.
Layered Oscillators
Activate Oscillator 2 with a triangle wave at -12 semitones for added thickness.
Subtle Filter Movement
Reintroduce Cutoff modulation from ENV 2, keeping it very subtle.
Exporting Your 808
- Record multiple notes (A, C, D, E, F, G are common in trap)
- Bounce each note as a separate audio file
- Trim and normalize the files
- Load them into a sampler such as EXS24 or Drum Machine Designer
You now have your own custom 808 sample library.
Conclusion
You’ve just created a professional 808 trap bass from scratch using only Logic Pro’s ES2. This approach gives you full control over your low-end and helps you develop a unique sonic identity.
The key ingredients are:
- Pure sine-wave sub-bass
- Mono playback for clarity
- Pitch envelope for attack
- Proper release times
- Controlled drive and distortion
Experiment, trust your ears, and build your own signature 808 sound.
What’s your favorite 808 style? Share your ES2 settings in the comments below.
#LogicProX #ES2 #808Bass #TrapMusic #SoundDesign #MusicProduction #HipHop #BassDesign
